Showing posts with label #SundayFunDay. Show all posts

Sunday, June 1, 2025

Crispy Iron Skillet Chicken Thighs

These crispy iron skillet chicken thighs turn out with the loveliest crunchy skin, lightly seasoned with just salt, black pepper and cayenne. Flattening them somewhat with a meat mallet makes them cook faster.

Food Lust People Love: These crispy iron skillet chicken thighs turn out with the loveliest crunchy skin, lightly seasoned with just salt, black pepper and cayenne. Flattening them somewhat with a meat mallet makes them cook faster.

This recipe is adapted from one in Cooking Light Magazine from way back in May 2015. I was introduced to it by a fellow blogger named Christiane whose blog was called Taking On Magazines One Recipe At A Time. It was a fun premise for a food blog and I loved her reviews of the recipes from various publications. 

Christiane doesn’t appear to be blogging anymore, which is such a pity but this recipe was such a winner that I made it the same day I read it. And have made it again and again since! 

Crispy Iron Skillet Chicken Thighs

Christiane says, and I concur, that the secret is not to move the chicken thighs in the iron skillet until the edges are brown. Also, as you will see from my photos, there will be spattering and smoke. If you have a spatter guard and fan vent, use them! Or open a window.

Ingredients
6 (6 oz or 170g) bone-in, skin-on chicken thighs, trimmed of extra fat
1 teaspoon fine sea salt
1 teaspoon cayenne
1 teaspoon freshly ground black pepper
1 tablespoon canola oil

Optional for garnish: parsley

Method
Preheat your oven to 500°F or 460°C. 

While it preheats, place the chicken thighs, skin side up, on a cutting board. Place cling film over the thighs and use a meat mallet or small iron skillet to pound them out to about ¾-inch thickness. 


Pat the chicken skin dry with a paper towel. Sprinkle chicken evenly with fine sea salt, paprika or cayenne and freshly ground black pepper.


Turn the thighs over and sprinkle the other side. 


Heat a 12-inch iron skillet over medium-high heat. Add oil to pan and swirl to coat. 


Add the thighs to the pan, skin side down and cook 9 minutes (leave them alone until the edges start to turn golden.) 


As mentioned above, this is the time to use a splatter guard and fan vent if you have them. There will be splattering and smoke! 


Turn the thighs skin side up and then transfer the hot skillet to the preheated oven. 


Bake for 9-10 minutes or until chicken is cooked through. Remove the iron skillet from the oven.

Food Lust People Love: These crispy iron skillet chicken thighs turn out with the loveliest crunchy skin, lightly seasoned with just salt, black pepper and cayenne. Flattening them somewhat with a meat mallet makes them cook faster.

 Transfer the thighs to plates. Garnish with some parsley, if desired.

Food Lust People Love: These crispy iron skillet chicken thighs turn out with the loveliest crunchy skin, lightly seasoned with just salt, black pepper and cayenne. Flattening them somewhat with a meat mallet makes them cook faster.

Enjoy! 

It’s Sunday FunDay and today we are sharing country cooking recipes in celebration of National Country Cooking Month. In my opinion, it doesn’t get more country than cooking fried chicken in an iron skillet. Many thanks to our host Wendy of A Day in the Life on the Farm. Check out the other country recipes below. 
 
We are a group of food bloggers who believe that Sunday should be a family fun day, so every Sunday we share recipes that will help you to enjoy your day. If you're a blogger interested in joining us, just visit our Facebook group and request to join.


Pin these Crispy Iron Skillet Chicken Thighs!

Food Lust People Love: These crispy iron skillet chicken thighs turn out with the loveliest crunchy skin, lightly seasoned with just salt, black pepper and cayenne. Flattening them somewhat with a meat mallet makes them cook faster.
 . 

Sunday, May 25, 2025

Deviled Quail Egg Shrimp Canapés

Made with hard-boiled quail eggs and cold boiled shrimp, you'll want to serve these tasty deviled quail egg shrimp canapés at your next party! 

Food Lust People Love: Made with hard-boiled quail eggs and cold boiled shrimp, you'll want to serve these tasty deviled quail egg shrimp canapés at your next party!

When I came across a dozen already cooked quail eggs at my local grocery store the other day, discounted price even, I knew they were coming home with me. And then, in the very next refrigerated case there was another discounted item, a container of cold boiled shrimp. I couldn’t wait put them together to create a delicious appetizer. 

I debated about what to set them on, besides a flavored cream cheese (in my head, that was already a given) and finally settled on making blinis but if you want, you can serve these atop cucumber slices or even round toasted slices of baguette, depending on the size of your shrimp.

Shrimp Deviled Quail Egg Canapés

If you don’t have already hard-boiled quail eggs, you can follow my instructions in my Scotch quail egg post, but let the eggs boil for four minutes. It’s a bit of a faff but not cooking them all at once makes them easier to peel, in my humble opinion. The blini batter will make more than you need. Eat the extras like pancakes with butter and jam and/or syrup. 

Ingredients
For the spread:
1 green onion top (green part only)
3 1/2 oz or 100g cream cheese, softened
1 fresh lemon wedge for juice
freshly ground black pepper

For the blini batter:
1 1/2 cups or 188g all-purpose flour
3/4 teaspoon fine sea salt
3/4 teaspoon baking powder
1 cup or 240ml milk, at room temperature
1 large egg, at room temperature
1 tablespoon unsalted butter, melted and cooled
1 tablespoon unsalted butter, for the pan

For the toppings:
12 hard-boiled quail eggs, peeled
12 cold boiled shrimp, peeled
2 tablespoons mayonnaise
1 teaspoon yellow mustard
hot sauce, optional
Smoked paprika for garnish

Method
First, finely mince the green onion top and set aside a little bit for garnish. Mix the rest with the softened cream cheese and a good squeeze of fresh lemon. Give it a few good grinds of black pepper, stir then set aside. 


Next, make the blini. Whisk together flour, salt, and baking powder in a large mixing bowl.


In another smaller bowl, whisk the milk, egg, and 1 tablespoon melted butter together.  Pour the wet ingredients into the flour mixture and whisk until the batter is fully combined.


Heat 1 tablespoon butter in a large skillet over medium-low heat. Cooking several blini at a time, drop batter, one tablespoon at a time, onto the heated skillet. Cook until bubbles form, 1 1/2 to 2 minutes. Flip and continue cooking until brown, about 1 minute more. 


Move to a paper towel-lined plate.  Repeat with the remaining batter until all the blini are cooked.


Halve the quail eggs and carefully remove the yolks to a small bowl.


Mash the yolks with a fork then add in the mayonnaise and mustard, continuing to mash and mix until you have a smooth mixture. Add a dash of hot sauce, if desired and mix again. 


Slice the shrimp in half lengthwise. 


To assemble the canapés, divide the cream cheese mixture between 24 blini arranged on a serving platter and spread it.


Top with a half shrimp followed by a half quail egg white. 


Use a piping bag or baggie with a corner cut off to pipe the yolk mixture back into the egg whites. 


Sprinkle with smoked paprika and the reserved green onion.

Food Lust People Love: Made with hard-boiled quail eggs and cold boiled shrimp, you'll want to serve these tasty deviled quail egg shrimp canapés at your next party!

Enjoy! 

Food Lust People Love: Made with hard-boiled quail eggs and cold boiled shrimp, you'll want to serve these tasty deviled quail egg shrimp canapés at your next party!

It’s Sunday FunDay and we are celebrating National Egg Month by sharing egg recipes. Check out all the links below.
 
We are a group of food bloggers who believe that Sunday should be a family fun day, so every Sunday we share recipes that will help you to enjoy your day. If you're a blogger interested in joining us, just visit our Facebook group and request to join.


Pin these Deviled Egg Shrimp Canapés!

Food Lust People Love: Made with hard-boiled quail eggs and cold boiled shrimp, you'll want to serve these tasty deviled quail egg shrimp canapés at your next party!

.

Sunday, May 11, 2025

Everything Bagel Smoked Salmon Cheese Ball

This Everything Bagel Smoked Salmon Cheese Ball is the perfect schmear for your favorite bagel with lemon zest, onions and capers. Send out the invites to brunch! 

Food Lust People Love: This Everything Bagel Smoked Salmon Cheese Ball is the perfect schmear for your favorite bagel with lemon zest, onions and capers. Send out the invites to brunch!

Cheese balls were one of my paternal grandmother’s favorite things so my mom bought her one just about every Christmas when they were available, I guess for Christmas parties. We didn’t see them for sale the rest of the year. They contained a variety of cheeses and were rolled in nuts. Very festive! 

When I became a grownup, I’d occasionally make her one as well. She wasn’t picky at all. All cheese balls are good cheese balls, a sentiment I now echo. As a kid, I wasn’t such a fan. 

Yep, now I am a big fan of cheese balls for any party occasion. One of the favorite ones I’ve ever made was for Halloween so it was shaped like a pumpkin. My second favorite is spicy and covered in nuts but it’s rivaled by this everything bagel seasoning smoked salmon edition! 

Everything Bagel Smoked Salmon Cheese Ball
This cheese ball was inspired by this savory cheesecake recipe. You can use orange colored cheddar but I think using a natural cheddar makes a prettier cheese ball. 

Ingredients - makes a 1 lb or 454g cheese ball
4 oz or 113g extra sharp natural cheddar
1 tablespoon onion, sliced as thinly as possible then minced
4 oz or 113g smoked salmon
1 tablespoon capers
8 oz or 225g cream cheese, softened
1 tablespoon everything bagel seasoning, plus extra for sprinkling
zest 1 lemon
2 tablespoons plain Greek yogurt

Method
Grate the cheddar. Using a sharp knife, chop the smoked salmon into small bits. 


Add all of the cheese ball ingredients into a large mixing bowl. 


Mash and stir until well combined and homogeneous. 


Scoop the mixture out on to a piece of cling film and use your hands and the cling film to mold it into a ball. 


Place the cheese ball in a round bowl and refrigerate for at least one hour to allow the flavor to meld, but it can be made a day ahead of serving. 

When chilling time is over, sprinkle everything bagel seasoning on the outside of the cheese ball, pressing it in so it sticks. 


Once it’s sufficiently covered, you can even roll the ball around to make it perfectly round. 

Serve with bagels or crackers or slices of baguette. I cut a large wedge to share with my mother-in-law and she ate hers on toast. It's all good. 

Food Lust People Love: This Everything Bagel Smoked Salmon Cheese Ball is the perfect schmear for your favorite bagel with lemon zest, onions and capers. Send out the invites to brunch!

Enjoy!

It’s Sunday FunDay and today we are sharing cheese ball recipes. Many thanks to our host, Amy of Amy's Cooking Adventures. Check out the links below.


We are a group of food bloggers who believe that Sunday should be a family fun day, so every Sunday we share recipes that will help you to enjoy your day. If you're a blogger interested in joining us, just visit our Facebook group and request to join.


Pin this Everything Bagel
Smoked Salmon Cheese Ball! 

Food Lust People Love: This Everything Bagel Smoked Salmon Cheese Ball is the perfect schmear for your favorite bagel with lemon zest, onions and capers. Send out the invites to brunch!

.

Sunday, May 4, 2025

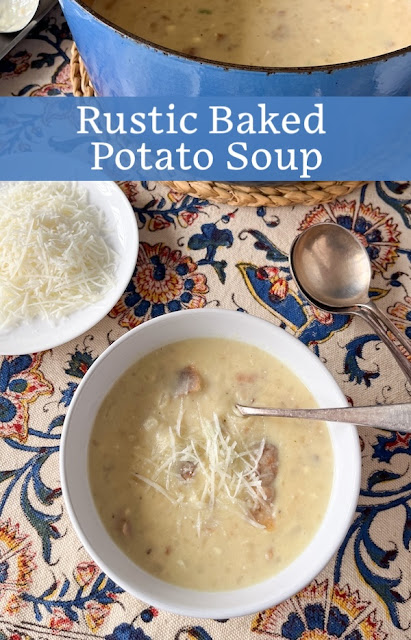
Rustic Baked Potato Soup

Better than Panera’s, (and so says my mother-in-law) this rustic baked potato soup starts with actual baked potatoes for more flavor and texture. It’s creamy and more-ish! 

Food Lust People Love: Better than Panera’s, (and so says my mother-in-law) this rustic baked potato soup starts with actual baked potatoes for more flavor and texture. It’s creamy and more-ish!

My wonderful mother-in-law doesn’t cook much for herself anymore, especially now after recovering from two successive broken legs (first the left, then when that healed, the right!) and two and a half months in rehab. So we’ve been cooking and bringing her meals to reheat as she needs them. 

Occasionally she asks me to run to the nearby Panera to pick her favorite rustic baked potato soup. It’s not a big serving still costs $7.99 but, hey, she needs the calories and nutrition so I would never object. But then it occurred to me that I could probably make a copy cat version MUCH cheaper. The great news is she likes mine better! Win-win.

Rustic Baked Potato Soup

The Panera Bread soup upon which this is modeled offers two options for topping, extra (or less) Asiago cheese and the addition of bacon for an extra charge. I’ve never added the bacon when ordering for my mother-in-law so I won’t do it here but feel free you want some! We aren't peeling these potatoes so choose a variety with thin skins like white or golden potatoes. If you must use russets, you might want to peel them. It won’t be the same though. 

Ingredients
2 lbs or 900g white or golden potatoes
Olive oil
4 cups or 960ml chicken stock
2 tablespoons butter
1 white onion
2 cloves garlic
4 oz or 113g cream cheese
1 green onion, green part only, sliced
1/2 teaspoon salt, if necessary (some chicken stock is pretty salty and that’s enough salt)
1/2 teaspoon freshly ground black pepper

To garnish: Asiago cheese, grated  

Method
Preheat your oven to 400°F or 200°C and line a pan with silicone mat or foil for easy clean up.

Scrub the potatoes clean and cut them in half lengthwise. Oil the silicone mat or foil with a good drizzle of olive oil then place the potatoes cut side down. Use a basting brush to oil the tops of the potatoes. 


Roast in your preheated oven for 15 minutes. Turn the potatoes cut side up and roast for another 15 minutes. 


While the potatoes are roasting, peel and chop your garlic and onion. 


Remove the potatoes from the oven and leave to cool. 


Melt the butter in a large pot over medium heat. Add the onion and garlic and sauté until the onion is translucent. I cover my pot because I find it helps soften the onion more quickly. 


Chop the potatoes into chunks. 


Add the potatoes and chicken stock to the pot. 


Bring to a boil then simmer for about 12 to 15 minutes by which time the potatoes should start to break down, if they haven’t already. 

Use a potato masher to mash some of the potatoes. 


Give the soup a good stir. If you like a thicker soup, mash more! The Panera soup does have some potato chunks so I tried to match that texture. 

Add the cream cheese and the sliced green onion and stir until the cheese has melted. Add the salt, if needed, and black pepper.


Serve garnished with shredded Asiago cheese.

Food Lust People Love: Better than Panera’s, (and so says my mother-in-law) this rustic baked potato soup starts with actual baked potatoes for more flavor and texture. It’s creamy and more-ish!

Enjoy!

It’s Sunday FunDay and we are celebrating moms ahead of Mother’s Day in the United States next weekend, sharing recipes in honor of the great women in our lives. Many thanks to our host, Wendy of A Day in the Life on the Farm. Check out the links below. 

 
We are a group of food bloggers who believe that Sunday should be a family fun day, so every Sunday we share recipes that will help you to enjoy your day. If you're a blogger interested in joining us, just visit our Facebook group and request to join.


Pin this Rustic Baked Potato Soup! 
Food Lust People Love: Better than Panera’s, (and so says my mother-in-law) this rustic baked potato soup starts with actual baked potatoes for more flavor and texture. It’s creamy and more-ish!


.